A damaged windshield is one of the most common issues car owners face, and it can be both frustrating and dangerous if not addressed quickly. Small chips, cracks, or pits can easily spread, reducing visibility and compromising safety on the road. Instead of rushing to an auto shop every time, many drivers now rely on Auto Windshield Repair Tools designed for home or professional use. These kits provide a cost-effective way to fix minor glass damage and prevent it from becoming a bigger problem.
This post will walk you through the essentials of windshield repair kits, what makes them effective, how professionals use them, and tips for choosing the right set.
Why Windshield Repair Matters
A windshield is not just a piece of glass that protects you from wind and debris. It’s a critical safety feature that helps maintain the structural integrity of your vehicle. When compromised, the risk of accidents and injuries increases significantly. A small crack may not look like much, but vibrations from driving, temperature changes, and even a minor bump can cause it to spread across the entire glass surface.
That’s where reliable repair kits come in. They allow you to restore clarity, maintain safety, and avoid the high cost of full windshield replacement.
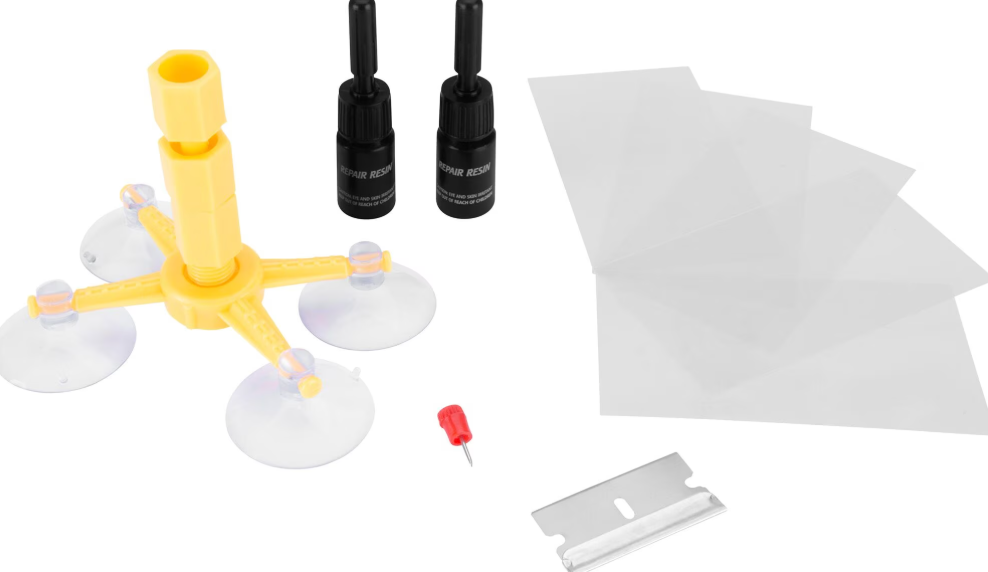
What Comes in an Auto Windshield Repair Kit
Most repair tools share similar components, although some advanced kits may include extra items for professional-grade results. Here’s what you can typically expect:
- Resin Solution: A special adhesive compound designed to fill chips and cracks, making them less visible and preventing further spreading.
- Applicator or Injector: A tool to push the resin into the damaged area under pressure.
- Curing Strips: Thin films placed over the resin to help it harden smoothly.
- UV Light or Sunlight Activation: Some kits rely on natural UV rays, while others include a small curing lamp.
- Razor Blade or Scraper: Remove excess resin and smooth the surface after curing.
Together, these components form the backbone of any reliable Auto Windshield Repair Tools kit.
Benefits of Using Auto Windshield Repair Tools
- Cost Savings: Professional windshield replacements can be expensive. A repair kit is a fraction of that cost.
- Convenience: With a kit, you don’t need to wait for an appointment or leave your car at the shop.
- Prevention: Early repairs stop cracks from expanding, saving you from full glass replacement.
- Improved Safety: Restoring visibility helps reduce accidents.
- Long-Lasting Results: When used properly, the repair can last as long as the windshield.
Professional vs DIY Kits
Not all repair kits are created equal. Broadly, they fall into two categories:
DIY Kits
These are designed for car owners who want a quick, simple fix. They come with step-by-step instructions, making them user-friendly even for beginners. DIY kits are best for minor chips and short cracks.
Professional Kits
Auto repair shops use these, which contain higher-grade resins, precision applicators, and sometimes advanced curing systems. They can handle larger cracks and deliver a more polished result, but they also require more skill to use effectively.
Step-by-Step Guide to Using a Windshield Repair Kit
- Clean the Area: Use a soft cloth to remove dirt and glass particles around the damaged spot. Avoid household cleaners, as they can interfere with resin bonding.
- Position the Applicator directly over the crack or chip, ensuring it seals tightly.
- Inject the Resin: Slowly apply pressure to push the resin into the crack. Some kits include a suction cup system to maintain pressure.
- Cure the Resin: Place the curing strip over the area and expose it to sunlight or UV light until hardened.
- Remove Excess Resin: Use the razor blade to scrape off leftover material for a smooth finish.
This process typically takes 30–60 minutes and can save you hundreds of dollars in repair costs.
Common Mistakes to Avoid
- Delaying Repairs: Waiting too long allows dirt and moisture to enter cracks, making repairs less effective.
- Improper Cleaning: Using glass cleaners with ammonia can weaken resin adhesion.
- Skipping UV Curing: The resin will remain soft and ineffective without proper curing.
- Overfilling Resin: Excess resin can create bumps that reduce clarity.
Avoiding these mistakes ensures a cleaner, stronger repair.
How to Choose the Right Repair Tools
When selecting a kit, consider the following factors:
- Type of Damage: Small star-shaped chips need different solutions than long cracks. Choose a kit that specifically mentions the type of damage you have.
- Ease of Use: Look for clear instructions, pre-measured resin, and simple applicators if you’re new to windshield repair.
- Curing Method: Decide between natural sunlight curing or kits with built-in UV lamps for more controlled results.
- Durability: Opt for high-quality resins that resist yellowing over time.
- Reusability: Some kits are single-use, while others can handle multiple repairs.
Conclusion
Windshield damage doesn’t always mean an expensive replacement. With the right Auto Windshield Repair Tools, you can handle minor chips and cracks at home, saving money and keeping your car safe. These kits are simple to use, effective, and widely available, making them a must-have for every driver who values safety and convenience.