Installing a heat pump may sound hard, but this simple guide shows each step in a clear and friendly way so anyone can follow along. The main point is this: when you understand how the system works, each step becomes easy. You do not need to be an expert to learn the process. You just need a calm mind, a little patience, and a good plan that keeps you moving forward.
A heat pump installation brings more comfort, lower bills, and cleaner air. This is why so many homes choose this system today. It works in both warm and cold seasons, and that makes life easier. But before you start, you need to know what the job involves. This guide will walk you through the full process from picking the right place, to turning the system on, and making sure your home stays safe and warm.
The first thing to know is that a heat pump has two main parts: an outdoor unit and an indoor unit. These work together to move heat, not create heat. That is why heat pumps save energy. When you understand this, the rest of the guide makes more sense and feels less scary.
Now, let’s take the steps one by one so you can see how everything fits together.
Choose the Right Spot
Choosing the right spot is the first step in a successful heat pump installation, and it helps the whole system work better. You want a place with good airflow, because the outdoor unit needs space to “breathe.” If you put it too close to a wall, fence, or bush, it may not work right. Pick a spot with shade if possible, because cooler air helps the system stay efficient. This small choice makes a big difference later.
Your indoor unit also needs a good place—somewhere high on a wall where air can flow across the room. If the air hits furniture or gets blocked by curtains, the heat pump cannot work its best. A small step like choosing the right spot saves you trouble in the future.
Prepare the Area
Once you find the spot, it is time to prepare it. This part is simple but important. The outdoor spot needs a stable base so the unit will not shake or tilt. Many people use a concrete pad or a strong wall bracket. This keeps the system safe during storms and heavy rain.
Make sure the ground is level. A small tilt can create noise or stress on the parts. Also, clear away grass, sticks, and loose dirt so nothing blocks the air. This is a fast step, but it gives your heat pump a clean and steady place to work from.
Mount the Indoor Unit
This step is where things start to come together. The indoor unit goes on a mounting plate that keeps it in the right position. The plate should be straight and tightly secured.
You will also make a small hole in the wall for the copper lines, drain tube, and control wire. It may look like a big step, but the hole is normally very small. It simply gives the system a safe path to connect indoors and outdoors.
When the unit sits on the plate, make sure it feels secure. A firm mount keeps the unit quiet and stable.
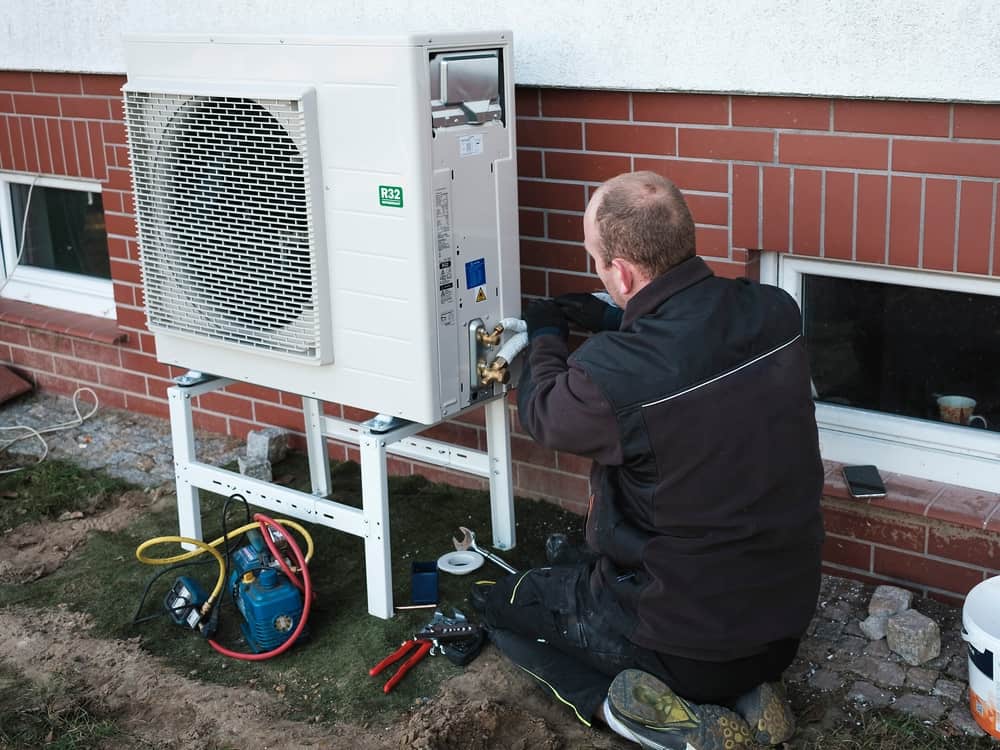
Set the Outdoor Unit
The outdoor unit is a little heavier, but the step is still simple. Place the unit on the pad or bracket you prepared earlier. Leave a little space behind it so air can move. Good airflow helps the system stay cool and quiet.
This is also a good time to check that nothing shakes or rattles. A heat pump works best when it sits solid and steady. Even a small wobble can turn into noise later, so fixing it now saves you trouble.
Connect the Lines
This part connects the brain and the heart of the heat pump. The copper lines carry the refrigerant between the two units. They must be tight and clean. The drain line removes water from the indoor unit. The wire controls the system and tells it what to do.
Each line has a job. When they are all connected well, the heat pump can move heat smoothly and safely. This part of the job takes care and patience, but it is the main step that brings the whole system alive.
Remove the Air From the Lines
Before the system can run, the air must be removed from the copper lines. This is done with a vacuum pump. When the lines are empty, the refrigerant can move freely. This keeps the air clean, safe, and dry inside the system.
This step protects the heat pump from damage. Moisture inside the lines can freeze or cause problems, so removing the air is a must. Once the lines are clear, the refrigerant can be released into them.
Check the Power
Now the system needs electricity. A heat pump uses a special electrical line that keeps it safe from overloads. The outdoor unit gets the power first, and then the indoor unit connects through a control wire.
This is a moment where many people take a deep breath because the system is almost ready to turn on. Checking the power makes sure everything is safe and ready. A steady power line helps the heat pump last for many years.
Start the System
This is the exciting step. When you turn the system on, the fan starts slow and then speeds up. The indoor unit sends gentle air across the room. The outdoor unit pulls in air and moves heat in or out.
Listen for any strange sounds. Feel if the air is warm or cool as expected. Watch if the unit drains water the right way. Most of the time, everything works smoothly. It feels great to see the system come alive after all the steps you followed.
Test the Modes
A heat pump has more than one mode. You should test heating, cooling, fan, and dry mode. Each mode gives you a different kind of comfort. Testing them now helps you learn how the system responds.
This also helps you understand how much sound and airflow is normal. When you know what “normal” feels like, you can easily spot problems in the future.
Keep Up With Care
The last step is long-term care. A heat pump will last many years if you clean the filter, clear debris from the outdoor unit, and check the lines every few months. These small tasks take only a little time, but they protect your home and help keep your bills low.
Good care makes your heat pump run smooth and quiet. It also helps you avoid costly repair surprises.
Final Thoughts
With these ten simple steps, a heat pump feels much easier to understand. Even if you do not install it yourself, knowing the process helps you make better choices and avoid mistakes. A system that is installed the right way gives comfort, clean air, and savings for many years.
If you ever need expert help, northernclimatehvac.ca is a trusted place to learn more.
FAQs
How long does a heat pump installation take?
Most installations take one full day. Some may need more time if the home needs new wiring or a stronger base.
How often should I clean the filter?
Check it once a month. A clean filter helps the system stay quiet and efficient.
Do heat pumps work in winter?
Yes, modern heat pumps work well even in cold weather. They pull heat from outdoor air and move it inside.